In Review...
In AppSheet & FRC: Episode 1, I showed the basic process for creating an app in AppSheet and getting AppSheet and Google Sheets to “talk to each other.” I also described the concept of keys: short strings uniquely identifying a given database entry. Finally, I explained how to collect some simple meta information regarding who submitted data to your app and when that data was submitted.
Headings and Shows
Each FRC match has a lot happening. Helping scouters to focus on what’s relevant by dividing up the information they’re asked to enter causes a reduction in mental strain. As a result, the amount of inaccurate data put into your database is lowered. That’s why splitting your app into multiple screens is crucial.
The way to do this in AppSheet is to use Shows. A Show is a specific data type, like Number or Text, which indicates to AppSheet that it should use the column in question to create a new screen.
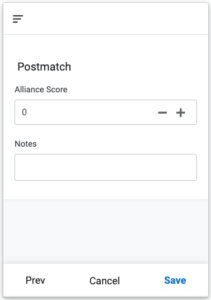
We want four separate screens for our scouters: Prematch, Autonomous, Teleoperation, and Postmatch. On the Prematch screen, they’ll input data about what match and robot they’re scouting. The Autonomous and Teleoperation screens are fairly self-descriptive: the scouters will input information on what the robot does during that portion of the match, nominally regarding how the robot scores points. As its name suggests, the Postmatch screen is for any analysis the scouters need to complete after the match has concluded. This final screen is where scouters would record the Alliance score and also where you can ask scouters to record subjective opinions on the robot’s performance.
For now, though, let’s pretend we’ll just be using two screens, one for Prematch and one for Teleoperation. Insert two new columns into your spreadsheet: Prematch between Timestamp and Event, and Teleoperation between Team Number and Score. Your spreadsheet should look similar to the screenshot below.

Next, head over to AppSheet and regenerate the structure of Match Scouting by using the Regenerate Structure button in the upper right of the Match Scouting table in the Columns view. Change the data type for both new columns to Show, and if AppSheet automatically added formulas for either, make sure to delete them.
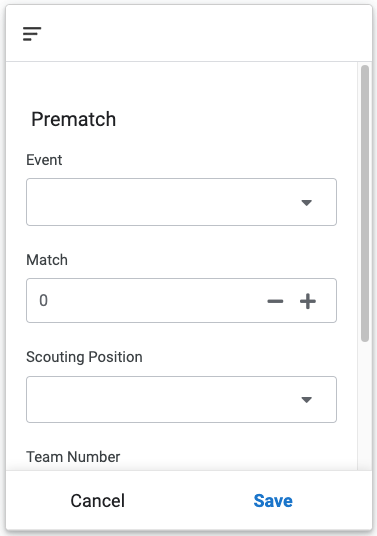
If you save your changes and test your app using the preview window, your app will now have multiple screens. Navigate between them using the Next and Prev buttons at the bottom of your preview window.
However, you’ll notice there’s nothing to tell you which screen you’re on. It’s pretty apparent to us right now, but it would be nice to make our scouter’s lives easier by telling them explicitly with a heading at the top of each screen.
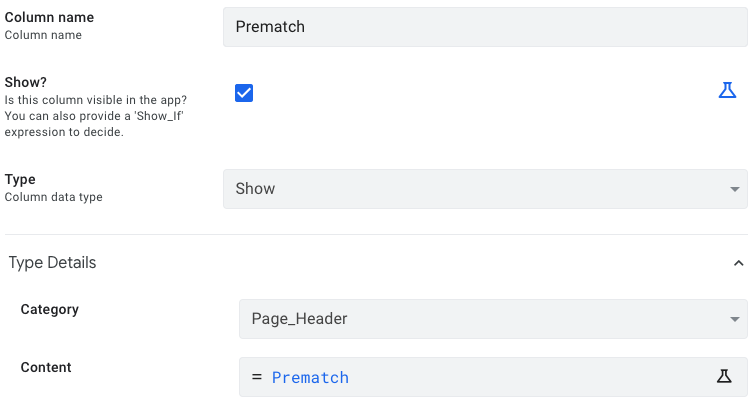
To do this, edit your Prematch column by clicking the pencil, then updating Type Details > Content to be Prematch. Do the same for the Teleoperation column except with Teleoperation instead.
Save your changes and then test out your app. The capabilities of your app won’t have changed much, but adding Show columns helps organize things in a much cleaner fashion. You’ll also notice that each screen now has a heading at the top to state clearly what the app is currently displaying.
Even More Data
We’ve constructed the foundation for our app, but right now, the only thing our scouters can track about the robot they’re scouting is its score. The next step is to add a series of columns, one for each new piece of information we want to track. Before adding those columns, let’s briefly analyze the 2022 game to determine what data we will ask our scouters to gather.
What to Track?
The 2022 game has three ways to score points, taxiing, shooting Cargo into the Hub, and climbing at the end of a match. Taxiing can be represented with a Yes/No column: either it happens or it doesn’t; yes or no; true or false. Whether a robot climbs (and if it does, how high it gets) can be tracked using an Enum: the scouter will select one of multiple mutually exclusive options.
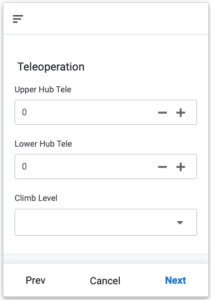
Scoring Cargo can be further broken down into subcategories: scoring in the Lower Hub during Autonomous, scoring in the Upper Hub during Autonomous, scoring in the Lower Hub during Teleoperation, and scoring in the Upper Hub during Teleoperation. We can track this using four separate Number columns.
It will also be helpful to note how many points the robot’s Alliance scores in total during each match, information which FRC helpfully makes available on the win/lose screen that announces a match’s victor. Tracking this information will allow us to determine what percentage of an Alliance’s points were contributed by any given robot. We’ll use one more Number column to track a robot’s Alliance’s score.
As one final item, let’s give our scouters a place to input any freeform qualitative data that doesn’t fit anywhere else. This is an ideal situation to use a LongText column, which is the same as a Text column, except it can store more information.
Climb Level Enum’s possible values should include None, Low, Mid, High, and Traversal. If there’s any other pertinent information you’d like to track, feel free to add a couple more entries to this list.Taxi– Yes/No – AutonomousLower Hub Autonomous– Number – AutonomousUpper Hub Autonomous– Number – AutonomousLower Hub Teleoperation– Number – TeleoperationUpper Hub Teleoperation– Number – TeleoperationClimb Level– Enum – TeleoperationAlliance Score– Number – PostmatchNotes– LongText – Postmatch
Adding New Columns
To start, it’s time we deleted the Score column we currently have. It’s served us well during testing up to this point, but it’s not a very descriptive name, and we want to track more granular data than just the total score of a robot.
Then, add two new Show columns named Autonomous and Postmatch, the former between Team Number and Teleoperation and the latter at the far right of our spreadsheet. When adding other new columns from the list above, they should be just to the right of the Show column of the screen you want them to appear on. For example, we want the Taxi column to appear on the Autonomous screen, so it should go to the right of the Autonomous column and the left of the Teleoperation column.
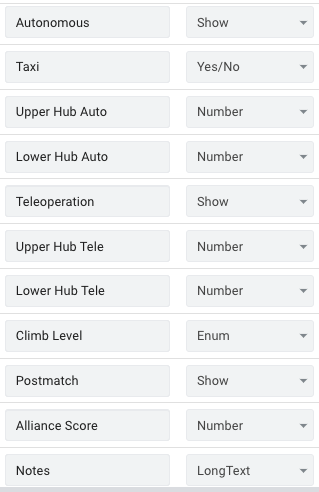
After you’re done adding new columns to Google Sheets, you’ve regenerated the structure of the Match Scouting table in AppSheet, and the datatypes for all columns are updated, you should be looking at something similar to the screenshot on the above right.
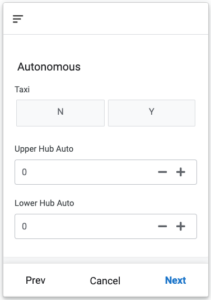
At this point, the app is nominally complete. We have columns to track a large but reasonable amount of valuable data. Furthermore, whenever a scouter submits an entry in our app, that information is ported back to Google Sheets for analysis. Your preview window in AppSheet should match up with the scrolling images on the right.
After making a few entries into your app, you should see something similar to the screenshot below back in Google Sheets.


What Next?
We’ve got a fully functional app, but currently, it’s pretty barebones. Creating a smooth user experience makes it much easier on scouters, so the next step is to improve the flow of our app and tweak a few settings to make things look and feel more elegant.
In the next episode, I’ll explain how to modify the ways in which users can input data into the app. I’ll also show how to employ basic error-checking to ensure that scouters have fewer opportunities to make mistakes.